BGP系列也好久没更新过了,最近放假放的有点久…干了点新的东西,让家里的网络用上自己的IP.
解决方案是 strongSwan IKEv2 VPN隧道到VPS服务器上,IKEv2 的证书使用的是Let’s encrypt的证书,域名挂在了CloudFlare上以便于调用api.
配置服务器环境
博主这里使用了 香港阿里云的轻量VPS CentOS7 (物理位置近+便宜) + HE.net 的BGP隧道,至于实现方案可以参考上一篇bgp系列的文章.
参考上一篇文章,这里在上一篇文章处做出一点修改.
- 首先将需要留给客户端的IP段从dummy1的IP删除,并且可以将自己的IP设为出口IP
之前的文章中配置并广播好了BGP但是出口ip还是 he.net 给的ip,并没有配置自己的IP为出口IP,解决这个问题其实很简单,只要将原有的
dummy1配置好的IP删除,将IP配置到sit1接口上,并把默认路由的src配置为出口的ip即可 (多谢群友
| |
安装并配置 acme.sh, 生成证书
- 安装 acme.sh ,用于自助签发TLS证书,并创建一个
alias方便使用.
1 2curl https://get.acme.sh | sh alias acme.sh=~/.acme.sh/acme.sh- 获取
CloudFlare的Api
至于详细的获取
CloudFlare Api Token可以参考利用CloudFlare Api实现DDNS.- 写
Token到环境变量
1 2export CF_Key="sdfsdfsdfljlbjkljlkjsdfoiwje" export CF_Email="xxxx@sss.com"- 现在,可以用命令自动创建证书了
1acme.sh --issue --dns dns_cf -d hex.moe -d vpn.hex.moe # 记得替换域名- 使用
acme.sh --cron可以生成 cronjob 自动更新证书
经过配置,应该可以在
/root/.acme.sh/vpn.hex.moe中看到你的证书1 2 3 4 5[root@host vpn.hex.moe]# pwd /root/.acme.sh/vpn.hex.moe [root@host vpn.hex.moe]# ls ca.cer vpn.hex.moe.cer vpn.hex.moe.csr vpn.hex.moe.key fullchain.cer vpn.hex.moe.conf vpn.hex.moe.csr.conf- 安装 acme.sh ,用于自助签发TLS证书,并创建一个
然后安装并配置
strongswan- 安装
strongswan
1yum install strongswan- 修改配置文件
ipsec.conf
这里使用了旧版的配置文件,由于已经配置好了遂不再更变.(
又不是不能用1vim /etc/strongswan/ipsec.conf以下是内容:
1 2 3 4 5 6 7 8 9 10 11 12 13 14 15 16 17 18 19 20 21 22 23 24 25 26 27 28 29 30 31 32 33conn setup uniqueids = no conn %default compress = yes keyexchange=ike ike=aes256-sha256-sha1-modp2048-modp1024,3des-sha256-sha1-modp2048-modp1024! esp=aes256-sha256-sha1,3des-sha256-sha1! leftdns=8.8.8.8,8.8.4.4,2001:4860:4860::8888 # 此处是dns rightdns=8.8.8.8,8.8.4.4,2001:4860:4860::8888 conn ikev2 dpdaction=clear dpddelay=60s rekey=no fragmentation=yes eap_identity=%identity left=%any leftid="vpn.hex.moe" # 签发证书的域名 leftsubnet=0.0.0.0/0,::/0 leftauth=pubkey leftcert=fullchain.cer leftsendcert=always leftfirewall=yes right=%any rightid=%any rightsourceip=10.1.0.0/24,2a0e:b107:16::/48 # 要分配给客户端的ip,这里用了双栈 rightauth=eap-mschapv2 rightsendcert=never auto=add还有一套是
swanctl.conf的新版配置文件,由于博主没有配置过所以不多做介绍. 可参考这一位博主写的 用 strongSwan 配一个支持 AEAD 的远程访问 IKEv2 VPN.配置
strongswan的证书 使用软连接方便更新ln -s [源路径] [目标路径], 将/root/.acme.sh/[域名]中的fullchain.cer放入/etc/strongswan/ipsec.d/certs[域名].key放入/etc/strongswan/ipsec.d/privateca.cer放入/etc/strongswan/ipsec.d/cacerts
配置
ipsec.secrets,添加用户1vim /etc/strongswan/ipsec.secrets以下是我写的内容:
1 2 3 4 5# ipsec.secrets - strongSwan IPsec secrets file : RSA vpn.hex.moe.key # 这里是私钥的文件名 #这里是用户名和密码,%any表示任意用户名均可,EAP后面的为密码 user1 %any : EAP "123456"
- 安装
配置
sysctl.conf, 开启Linux的内核转发1/etc/sysctl.conf在后面添加开启相关转发的内容
1 2 3 4net.ipv4.ip_forward = 1 net.ipv4.conf.all.accept_redirects = 0 net.ipv4.conf.all.send_redirects = 0 net.ipv6.conf.all.forwarding=1配置iptables防火墙
1 2 3 4 5 6 7 8 9iptables -A INPUT -p ah -j ACCEPT iptables -A INPUT -p esp -j ACCEPT iptables -A INPUT -p udp -m udp --dport 500 -j ACCEPT iptables -A INPUT -p udp -m udp --dport 4500 -j ACCEPT iptables -A POSTROUTING -t nat -m policy --pol ipsec --dir out -j ACCEPT iptables -A POSTROUTING -t nat -s 10.1.0.0/24 -o eth0 -j MASQUERADE iptables -A FORWARD -t nat -i eth0 -m policy --pol ipsec --dir in -j ACCEPT iptables-save systemctl restart iptables虽然说如果
ah和esp头如果走不通的话会走udp协议,但是还是加上了在阿里云的防火墙中开启
udp500和udp4500端口firewalld的防火墙类似,由于博主的centos默认是iptables的并没有实践过,所以这里贴出某位博主帖子里写的内容.
允许 ‘AH’ 和 ‘ESP’ 身份验证协议和加密协议通过防火墙
1
2
firewall-cmd --zone=public --permanent --add-rich-rule='rule protocol value="esp" accept' firewall-cmd --zone=public --permanent --add-rich-rule='rule protocol value="ah" accept'开放 ipsec 和相关端口
1
2
3
firewall-cmd --zone=public --permanent --add-port=500/udp firewall-cmd --zone=public --permanent --add-port=4500/udp firewall-cmd --zone=public --permanent --add-service="ipsec"允许 ip 伪装
1firewall-cmd --zone=public --permanent --add-masquerade然后重新加载防火墙
1firewall-cmd --reload启动
strongswan服务systemctl restart strongswan
此时就能用Windows连接到IKEv2 VPN了!
连接VPN
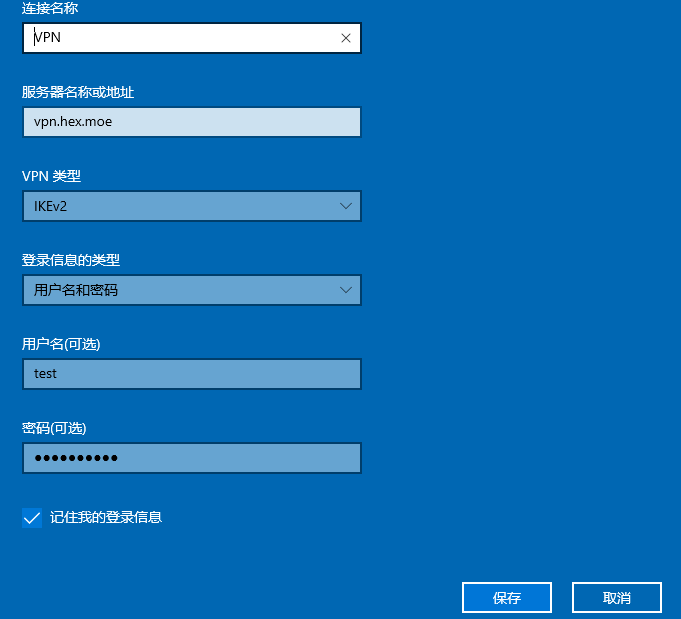
打开Win10的 设置->网络和Internet->VPN 并点击 添加VPN连接

写好配置并保存.
然后点击 状态->更改适配器选项 右键 VPN->属性->网络
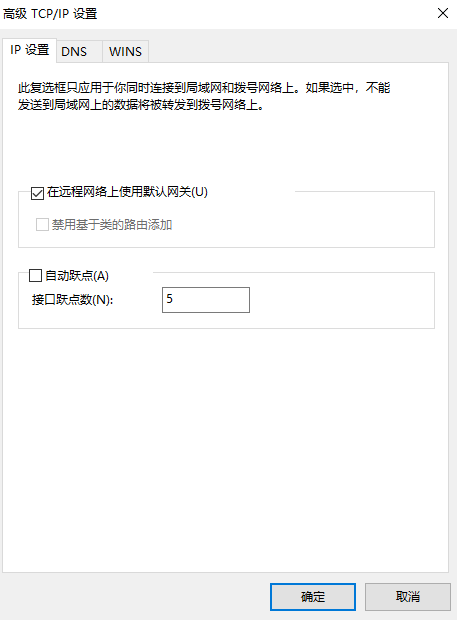
如果需要使用IPv4和IPv6流量都走VPN隧道的话你需要稍微调整下IPv4的设置
点击IPv4->属性->高级 勾选 在远程网络上使用默认网关和 取消勾选 自动跃点 跃点数写一个相对小的数值,比如说,我写了5

当然,我现在并不需要(
所以我将IPv4勾掉了,ipv4流量不走vpn,后来我连接上后…
…
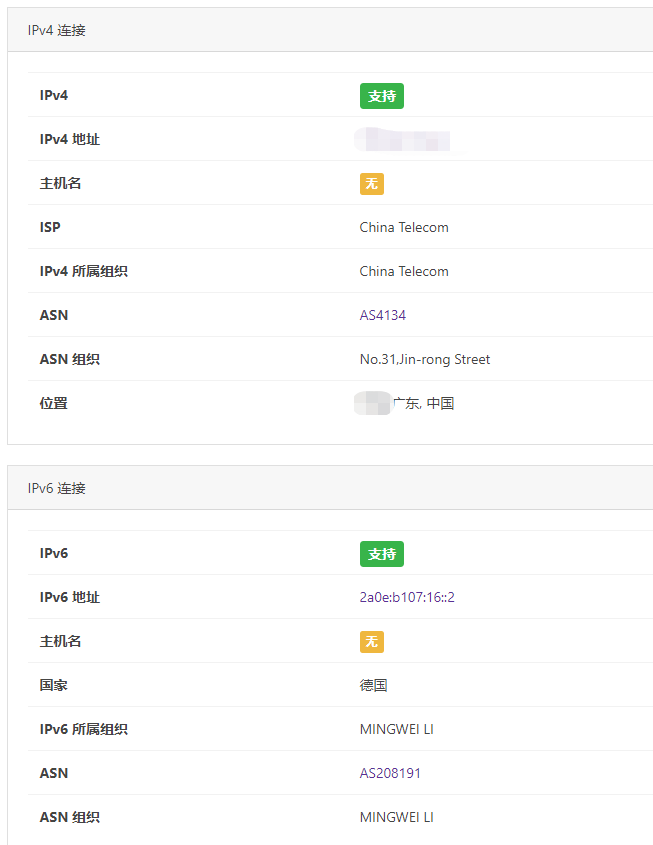
IPv6检测失败
后面了解到,虽然IPv6中也有一个 在远程网络上使用默认网关 但是那个完全没有用,也不知道微软阿三程序员怎么写的,总之就是没有用,需要手动配置一下路由
所以,连接上VPN后,在cmd中敲入 ipconfig 查看分配到的ip

并手动添加路由…

请求的操作需要提升(权限) , 好吧 ,右键左下角的 Win 图标, 选择 Windows Powershell (管理员),用打开的shell再次手动添加路由
| |
此时再去测试一下…

终于成功了,这也太累了…
后记
其实想做这个项目已经很久了,只是一直没有动力去做,刚好放假放了这么多天,游戏也玩腻了,刷各种网站也刷累了,看到了某篇 Noob BGPlayer in 1hour 绝赞速成班 ,就来实现自己的方式了"带入家中"了,当成功的那一刻还是很开心的…
最后感谢MoeQing动物园的各位dalao的答疑(
什么?你说近期啊,近期还有一篇水文
以上
参考
- https://blog.itnmg.net/2018/08/28/centos-7-ikev2-vpn-strongswan/
- https://www.91yunbbs.com/discussion/641/drcais-noob-bgplayer-in-1hour-%E7%BB%9D%E8%B5%9E%E9%80%9F%E6%88%90%E7%8F%AD-%E9%80%83
- https://recursiveg.me/2016/12/assign-ipv6-through-ipsec-and-strongswan/
- https://m13253.blogspot.com/2018/07/strongswan-ikev2-vpn.html